
 PlayStation Repair
 Xbox Repair
 Nintendo Repair
 Virtual reality (VR) Repair
 Accessories Repair
Fix Your PS4 Pad: Controller Repair Guide
Discover the secrets to fixing your PS4 controller with this comprehensive repair guide – get back to gaming in no time!
 Image courtesy of Sergey Meshkov via
 Table of Contents
- Introduction to PS4 Controller Repair
- Identifying Your PS4 Controller Type
- Tools You Will Need
- Common PS4 Controller Problems
- Safety First!
- Step-by-Step Guide to Opening Your PS4 Controller
- Fixing Sticky Buttons
- Correcting Drifting Joysticks
- Reassembling Your PS4 Controller
- Testing Your Repaired Controller
- When to Seek Professional Help
- Conclusion: Recap of PS4 Controller Repair Guide
- FAQs
Introduction to PS4 Controller Repair
Have you ever found yourself frustrated with your PS4 controller acting up? Maybe the buttons are sticking, or the joysticks are drifting on their own. Don’t worry; you’re not alone! In this guide, we’ll dive into the world of PS4 Controller Repair and learn how you can fix these issues yourself.
Repairing your PS4 controller can be a rewarding experience and save you money on buying a new one. We’ll explore why taking matters into your own hands can be a great idea when it comes to fixing your PlayStation gear.
So, let’s roll up our sleeves and get ready to tackle those pesky controller problems!
Identifying Your PS4 Controller Type
Before diving into fixing your PS4 controller, it’s important to identify which type of controller you have. This will ensure that you are working on the right model and using the correct repair techniques. Let’s explore how to differentiate between the various PS4 controller types.
PS4 Original vs. V2 Controller
The original PS4 controller and the V2 version have some key differences that you can spot. The V2 controller typically has a light bar on the touchpad, allowing for more interactive gaming experiences. Additionally, the V2 controller may have improved battery life compared to the original version. Take a look at your controller to see if it has these distinguishing features to determine which type you have.
PS4 Slim and PS4 Pro Controllers
If you have a PS4 Slim or PS4 Pro console, you may notice differences in the controllers that come with these systems. The controllers for the PS4 Slim and PS4 Pro are often more streamlined and may have enhanced features to complement the upgraded consoles. Check for any specific markings or design elements on your controller to identify whether it belongs to a PS4 Slim or Pro system.
Tools You Will Need
Before you start fixing your PS4 controller, it’s important to gather all the necessary tools and supplies. Here’s a quick guide to what you’ll need:
Start your Buy, Sell, Repair Game Console. To find your closest store
1. Screwdriver Set:
You’ll need a screwdriver set with various sizes to help you open up the controller and access its components.
2. Tweezers:
Tweezers can be handy for handling small parts and delicate components inside the controller.
3. Isopropyl Alcohol:
Isopropyl alcohol can be used to clean the buttons and joysticks of your controller, especially if they are sticky.
4. Cotton Swabs:
Cotton swabs can help you clean hard-to-reach areas and remove any dirt or grime that may be affecting your controller’s performance.
5. Replacement Parts:
If you identify any damaged parts while inspecting your controller, make sure to have replacement parts on hand before you start the repair process.
With these tools and supplies ready, you’ll be well-equipped to tackle any issues with your PS4 controller and get it back in working order.
Common PS4 Controller Problems
When you’re deep into a gaming session on your PS4, the last thing you want is your controller acting up. Let’s take a look at some common PS4 controller problems and how you can solve them.
Sticky Buttons
Have you ever pressed a button on your controller only to feel it sticking or not responding the way it should? This can be incredibly frustrating, especially in the midst of an intense game. Sticky buttons often occur due to dirt and grime build-up or wear and tear over time.
To fix this issue, you can gently clean around the problematic buttons using a cotton swab dipped in rubbing alcohol. Make sure to press the buttons several times while cleaning to help remove any stubborn debris. This should help restore the smooth functionality of your buttons.
Drifting Joysticks
Another common problem that PS4 gamers encounter is joystick drift. This is when your controller’s joysticks start moving on their own, making it challenging to control your in-game movements accurately. Joystick drift can be caused by dust or debris lodged underneath the joystick or wear on the internal components.
To address joystick drift, try gently blowing compressed air around the base of the affected joystick to dislodge any dirt particles. If this doesn’t solve the issue, you may need to open up your controller for a more thorough cleaning or to inspect the internal components for any signs of damage.
Safety First!
When you’re getting ready to fix your PS4 controller, it’s essential to remember that safety comes first. We want to make sure you don’t accidentally hurt yourself or damage anything in the process. Let’s go over some safety tips together!
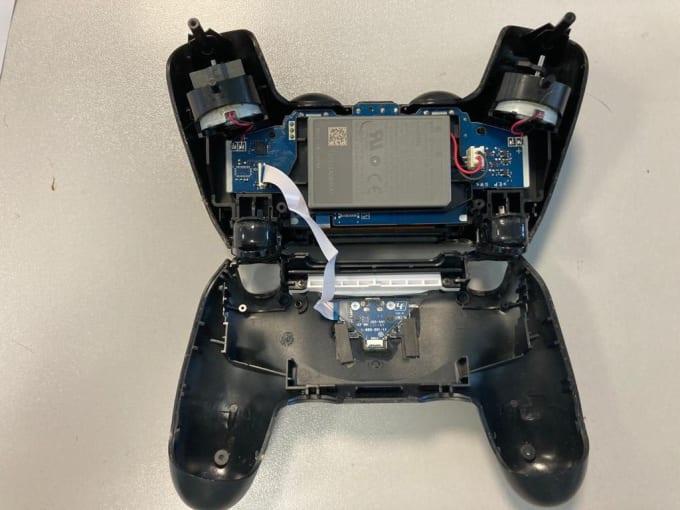 Image courtesy of www.fiverr.com via Google Images
Safety Tips for PlayStation Repairs
Before you start working on your PS4 controller, make sure to unplug it from the console if it’s connected. This will prevent any electric shocks while you’re handling the controller.
It’s also a good idea to find a clean, well-lit workspace to do your repairs. A clutter-free area will help you keep track of all the small parts and tools you’ll be using.
Protecting Yourself During Repairs
While working on your PS4 controller, it’s wise to wear safety goggles to shield your eyes from any small pieces that might spring loose. And if you’re using any sharp tools, like screwdrivers, be sure to handle them with care to avoid accidents.
Additionally, it’s a good practice to keep any liquids away from your workspace. Spills can cause damage to your controller or even lead to electric shock if they come into contact with power sources.
By following these safety tips, you can ensure a smooth and accident-free repair process for your precious PS4 controller. Now let’s dive into fixing those common issues!
Step-by-Step Guide to Opening Your PS4 Controller
Are you ready to dive into the inner workings of your PS4 controller to fix those pesky issues? Follow these steps to safely open up your controller and take a look inside.
Step 1: Gather Your Tools
Before you begin, make sure you have all the necessary tools at hand. You’ll need a small Phillips screwdriver, a plastic opening tool, and a clean workspace to prevent losing any tiny screws.
Step 2: Remove the Screws
Flip your PS4 controller over and locate the screws holding it together. Use the Phillips screwdriver to carefully unscrew these screws and keep them in a safe place. Be gentle to avoid damaging the controller.
Step 3: Separate the Controller
Once the screws are removed, gently pry open the controller using the plastic opening tool. Start at one end and work your way around the edges to slowly separate the two halves of the controller. Be patient and avoid using excessive force.
Step 4: Take Note of Internal Components
As you open the controller, pay attention to the internal components such as the circuit board, buttons, and joysticks. Take note of how everything is positioned so you can easily put it back together later.
Step 5: Address the Issue
Now that you have access to the inner workings of your controller, you can identify and address the specific problem you’re facing. Whether it’s fixing sticky buttons or addressing drifting joysticks, this is the time to troubleshoot.
Step 6: Proceed with Caution
Be careful as you work on fixing the issue. Avoid touching any sensitive electronic components and follow any specific repair instructions you may have for your particular problem. Double-check your work before moving on.
With these steps, you’ll be able to safely open up your PS4 controller and begin the repair process. Remember to take your time and proceed methodically to ensure a successful repair.
Fixing Sticky Buttons
Is your PS4 controller giving you a hard time because the buttons feel sticky or are getting stuck when you try to press them? Don’t worry; we’ve got you covered! Let’s walk through a detailed guide on how to fix those sticky buttons and get your controller working smoothly again.
Why Do Buttons Get Sticky?
Sticky buttons on your PS4 controller can happen for a few reasons. Sometimes it’s due to dirt, dust, or debris that has built up around the buttons over time. Other times, it could be because of wear and tear on the internal components of the controller. No matter the cause, we can fix it!
Tools You’ll Need
Before we get started, gather a few simple tools like a small screwdriver, cotton swabs, rubbing alcohol, and some compressed air. These items will help you clean and troubleshoot the sticky buttons on your controller.
Fixing Process
1. Start by gently prying open the controller using the proper tools to avoid damaging the casing.
| Issue | Possible Cause | Solution |
|---|---|---|
| PS4 controller not connecting to console | Bluetooth connection issue | Reset controller and re-pair with console |
| Buttons not responding | Sticky or stuck buttons | Clean and lubricate buttons |
| Thumbsticks drifting | Dust or debris under thumbsticks | Remove thumbsticks and clean underneath |
| Controller not charging | Charging port issue or faulty battery | Replace charging port or battery |
2. Once the controller is open, carefully remove the buttons from the controller and clean them using a cotton swab dipped in rubbing alcohol. This will help remove any grime or dirt causing the stickiness.
3. While the buttons are out, use compressed air to blow out any debris or dust that may be trapped beneath the buttons.
4. Inspect the button contacts and rubber pads for any signs of wear or damage. If you notice any issues, consider replacing these components with new ones that can be easily purchased online.
5. Reassemble the controller, making sure all buttons fit snugly in their place. Secure the casing back together, being careful not to pinch any wires or cables.
6. Test the controller to ensure that the buttons are no longer sticky and that they function correctly. If the issue persists, you may need to repeat the cleaning process or seek further repairs.
By following these steps, you should be able to tackle those stubborn sticky buttons on your PS4 controller and enjoy a smoother gaming experience. If you encounter any difficulties or feel unsure about the process, don’t hesitate to reach out for help or consult a professional for assistance.
Correcting Drifting Joysticks
Do you ever notice that your game character seems to have a mind of its own? If your joystick is drifting, causing your character to move without you touching it, don’t worry! We’re here to help you fix this issue.
This is how you tackle those pesky drifting issues on your joysticks.
Drifting joysticks can be frustrating, but the good news is that they can often be corrected without too much hassle. The drifting phenomenon usually happens due to dust or debris that accumulates inside the joystick mechanism.
To address this problem, you will need to open up your controller and carefully clean the joystick components. Remember to take your time and be gentle with the delicate parts inside.
If cleaning the joystick doesn’t solve the drifting issue, you may need to replace the joystick component. You can find replacement parts online or at a gaming store, and with a little bit of patience, you can swap out the old joystick for a new one.
Once you’ve cleaned or replaced the joystick, carefully put your controller back together following our reassembling guide. Make sure all the components fit back snugly in place.
After reassembly, it’s time to test out your controller and see if the drifting issue has been resolved. Test the joysticks in different games to ensure they are functioning correctly.
Remember, if you encounter any difficulties during the repair process or if the drifting problem persists after your attempts, it might be best to seek the help of a professional to ensure your controller is in top working condition.
Reassembling Your PS4 Controller
After fixing any issues with your PS4 controller, it’s time to put everything back together. Follow these steps carefully to ensure everything works perfectly once it’s reassembled.
 Image courtesy of www.etsy.com · In stock via Google Images
Step 1: Aligning the Controller Parts
Make sure all the components are in the right position before reassembly. Check that the buttons, joysticks, and other parts fit into their designated slots. Avoid forcing anything as it could lead to further damage.
Step 2: Connecting Internal Wires
Carefully reconnect any internal wires that were detached during the repair process. Double-check each connection to ensure everything is securely in place. Loose wires could cause the controller to malfunction.
Step 3: Closing the Controller
Gently close the controller casing, ensuring that all parts are properly aligned. Gradually press the pieces together, being cautious not to pinch any wires between the components. Make sure there are no gaps or misalignments in the casing.
Step 4: Reattaching Screws
Once the controller is securely closed, begin reattaching the screws to hold everything in place. Tighten the screws evenly to prevent any imbalance in the controller casing. Avoid over-tightening, as this could damage the screws or strip the threads.
Step 5: Testing the Controller
Before putting the final screws in place, test the controller to ensure all the buttons and joysticks are working correctly. Check for any remaining issues and make adjustments if necessary. Once everything is in working order, finish securing the screws.
Testing Your Repaired Controller
Now that you’ve fixed your PS4 controller, it’s time to test it out to make sure everything is working perfectly. Here’s how you can check if your repairs were successful:
Button Functionality
Start by pressing each button on your controller to ensure they all respond correctly. Test the face buttons, triggers, and joysticks to make sure each one registers your input without any issues.
Connection Test
Connect your controller to your PS4 console and check if it pairs up seamlessly. Try navigating through the menu and launching a game to confirm that the controller is properly connected and functioning as expected.
Joystick Calibration
If you previously had joystick drift issues, test out the joysticks to see if the problem has been resolved. Move them in all directions to ensure they are accurate and responsive without any unwanted movements.
Wireless Functionality
If your controller is wireless, test the wireless connection to make sure it remains stable and doesn’t cut out during gameplay. Walk around the room a bit while using the controller to see if the signal remains strong.
Battery Life
If your controller has a rechargeable battery, fully charge it and check how long the battery lasts during use. Make sure it holds a charge for a decent amount of time before needing to be recharged.
By following these testing procedures, you can ensure that your repaired PS4 controller is in top-notch condition and ready for many more hours of gaming fun!
When to Seek Professional Help
Sometimes, fixing your PS4 controller on your own might be more than you bargained for. If you find yourself facing a repair that seems too complicated or if you’re not comfortable taking the controller apart, it’s okay to seek help from a professional. Here are some situations where professional help might be the best option:
 Image courtesy of www.amazon.com via Google Images
Complex Issues
If the problem with your PS4 controller seems complicated and you’re unsure of how to proceed, it’s better to let an expert handle it. They have the knowledge and experience to diagnose and fix intricate problems that may be beyond your skills.
Specialized Tools Required
Some repairs may require specialized tools that you don’t have access to. Professionals are equipped with the right tools to open up your controller safely and make the necessary repairs without causing any damage.
Risk of Damage
If you’re worried about accidentally damaging your controller further while attempting a repair, it’s best to leave it to the professionals. They have the expertise to handle delicate components and prevent any additional harm to your device.
Remember, it’s essential to know your limits when it comes to fixing electronic devices. Seeking professional help ensures that your PS4 controller gets the expert care it needs to function properly again. Don’t hesitate to reach out to qualified technicians if you’re unsure about tackling a repair on your own.
Conclusion: Recap of PS4 Controller Repair Guide
In this guide, we’ve covered everything you need to know about repairing your PS4 controller. From identifying your controller type to tackling common problems like sticky buttons and drifting joysticks, we’ve walked you through each step of the repair process.
Remember, safety always comes first, so make sure to follow the precautions we’ve outlined before attempting any repairs. With the right tools and a bit of patience, you can save money and extend the life of your favorite gaming accessory.
After successfully fixing your controller, don’t forget to test it out to ensure everything is working as it should. If you encounter any difficulties or the repair seems too complex, don’t hesitate to seek professional help.
By following this guide, you can become your own DIY repair expert and keep your PS4 controller in top condition for many more hours of gaming fun. Happy repairing!
FAQs
If you still have questions about fixing your PS4 controller, don’t worry! Here are some answers to help clear things up for you:
Can I fix my PS4 controller by myself?
Absolutely! With the right tools and a step-by-step guide, you can give it a shot. Just be sure to follow the instructions carefully.
Do I need any special skills to repair my PS4 controller?
Not really. As long as you can follow directions and handle tools safely, you should be able to tackle the job.
What if I can’t figure out the problem with my PS4 controller?
If you’re unsure what’s wrong or how to fix it, it might be best to seek help from a professional. They have the expertise to diagnose and repair more complex issues.
How long does it usually take to repair a PS4 controller?
It depends on the problem and your experience. Simple fixes like cleaning sticky buttons can be done relatively quickly, while more complex issues might take longer.
Remember, patience and attention to detail are key when it comes to repairing electronics like your PS4 controller. Don’t rush and take your time to do it right!
Book your Game Console, Controller Repair

Your Repair , Our Concern- Leave your mobile phone number and we will call you back . Consolefixit are experts at fixing game consoles. If your Xbox, PlayStation, or Nintendo is broken and needs repairing, give us a call for a free quote today.


