From here you can book your game console, controller repair with us
Game Console & Controller Repairs
Any PS5 Console, PS5 Controller
Any PS4 Console, PS4 Controller
Any Xbox Series Console, Xbox Series Controller
Any Xbox One Console, Xbox One Controller
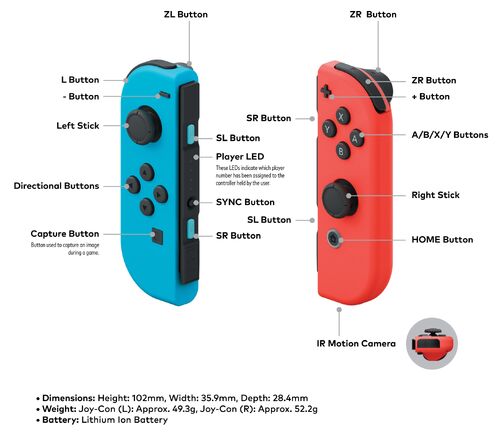
Any Nintendo Switch Console, Joy Con Controller
Hey friends! Have you ever had a gaming day planned but found out your Joy-Con is acting funny? No worries! We’ll learn how to fix our Nintendo Switch Joy-Cons so we can get back to the fun!
Understanding the Problem with Your Joy-Con
First off, we need to figure out what’s wrong with our Joy-Con. Is it not moving right, or maybe the buttons aren’t working? We’ll take a look at some common issues.
Common Issues and Symptoms
Let’s chat about the usual troubles Joy-Cons can have. Sometimes they drift or the buttons might stick. Knowing these signs helps us fix them!
Gathering the Right Tools
Before we dive into fixing our Nintendo Switch Joy-Con, we need to make sure we have the right tools on hand. Let’s gather everything we need to kickstart our repair mission!
List of Necessary Tools and Materials
First off, we’ll need some tiny screwdrivers to help us open up the Joy-Con. These little tools are essential for accessing the inside of our controller. Additionally, having a pair of tweezers can be super handy for handling small parts and making precise adjustments.
Next, it’s a good idea to have some cotton swabs and rubbing alcohol on standby. These will come in handy for cleaning any dirty contacts or components inside the Joy-Con. A clean connection is a happy connection!
Lastly, having replacement parts ready just in case is a smart move. You never know when you might need a new joystick or button to swap out a faulty one. Being prepared with spare parts can save us time in the long run.
Opening Up the Joy-Con
Are you ready to dive into the world of Joy-Con fixing? Let’s grab our tools and open up the Joy-Con to see what’s going on inside. It’s like exploring a secret world of circuits and buttons!
First things first, we need to be gentle and patient as we crack open the Joy-Con. It’s like opening a treasure chest, but instead of gold, we’ll find tiny screws and electronic wonders inside.
1. Grab your tiny screwdriver and carefully remove all the screws holding the Joy-Con together. Make sure to keep them safe so we can put everything back together later.
2. Gently pry apart the plastic casing of the Joy-Con. It might feel like solving a puzzle, but you’ll see the inside components waiting to be fixed.
3. Take a good look inside and observe the buttons, joysticks, and all the magical bits that make our Joy-Con work. We’re on a mission to find out what’s causing the trouble.
Now, let’s be super careful and open up the Joy-Con. We’ll see what’s inside and start our detective work to find out what needs fixing.
With the casing off, we can see the inner workings of our Joy-Con. It’s like peeking behind the curtain of a magic show to discover how the tricks are done.
4. Inspect each component carefully for any signs of damage or wear. Look for loose connections or broken pieces that might be causing the issue.
5. Take your time to study the layout of the Joy-Con’s internals. It’s like exploring a new map in a video game, but instead of enemies, we’re looking for faulty parts to defeat.
By following these steps, we can uncover the mystery of what’s ailing our Joy-Con and get one step closer to fixing it. Opening up the Joy-Con is the first exciting step in our repair journey!
Diagnosing the Joy-Con Issue
With our Joy-Con open, it’s time to investigate what’s causing all the trouble. Let’s take a closer look inside our trusty controller and see what’s going on.
Identifying Broken Parts
Now that we have the Joy-Con opened up, we need to be detectives and search for any parts that seem unhappy. Look closely at all the little bits and bobs inside. Do you see anything that looks out of place or damaged?
If you spot something that doesn’t look quite right, that might be our culprit! It could be a loose connection, a broken piece, or even just some dust causing mischief. Our job is to find the troublemaker so we can fix it up.
Repairing or Replacing Joy-Con Components
Now that we have figured out what was causing trouble with our Joy-Con, it’s time to get our hands dirty and start fixing it! We have two options – we can either repair the parts that are acting up or replace them with brand new ones.
If we notice that something is loose or not working quite right, we can try to fix it ourselves. This might involve tightening screws, cleaning out dust, or adjusting components to get everything back in top shape. It’s like giving our Joy-Con a little tune-up to keep it running smoothly.
Replacing Faulty Parts
Sometimes, a part in the Joy-Con might be too damaged to repair. In that case, we can replace it with a new one. This could mean swapping out a joystick, a button, or any other component that isn’t working properly. It’s like getting a shiny upgrade for our trusty controller!
Putting the Joy-Con Back Together
After our hard work fixing our Joy-Con, it’s time to reassemble it and put all the pieces back together. Let’s make sure we do it right so we can get back to gaming without any issues!
Reassembly Steps
Now that we’ve identified and fixed the problems with our Joy-Con, it’s time to put everything back where it belongs. Follow these steps to ensure a successful reassembly:
1. Start by carefully placing the circuit board back into the Joy-Con housing. Make sure it fits snugly and aligns properly with the buttons and joystick.
2. Next, reconnect any cables or connectors that were disconnected during the repair process. Be gentle and ensure they are firmly attached to their corresponding ports.
3. Carefully insert the battery back into its slot, making sure it is securely in place. Double-check that all components are properly aligned before moving forward.
4. Once all the internal components are back in place, carefully position the back cover of the Joy-Con over the front housing. Slowly press down on the cover to snap it back into position.
5. Use your screwdriver to re-insert all the screws you removed earlier. Make sure to tighten them securely without overtightening, as this could damage the Joy-Con.
6. Finally, give the Joy-Con a gentle shake to ensure everything is securely in place. Power on your Nintendo Switch and test the Joy-Con to make sure all buttons and joysticks are functioning properly.
By following these reassembly steps carefully, you can ensure that your Joy-Con is back together correctly and ready for more gaming adventures!
Testing the Repaired Joy-Con
Now that we’ve fixed up our Joy-Con, it’s time to put it to the test! We want to make sure all our hard work has paid off and that our controller is back in tip-top shape.
Image courtesy of nintendo.fandom.com via Google Images
How to Test Functionality
Let’s start by checking each button on our Joy-Con. Press each one to see if they respond smoothly and quickly. If any button feels sticky or unresponsive, we might need to go back and make some adjustments.
Next, let’s test our joysticks. Move them in all directions to ensure they are working correctly. If you notice any drifting or lagging movements, that could mean we need to make some additional tweaks.
After checking all the buttons and joysticks, let’s connect our Joy-Con back to the Nintendo Switch. Try playing a game or navigating through menus to see if everything is working as it should. If you encounter any issues during gameplay, we might need to revisit our repair steps and make necessary corrections.
Once you’re certain that your Joy-Con is behaving as it should and responding accurately to your commands, congratulations! You’ve successfully repaired your Joy-Con and can now enjoy uninterrupted gaming sessions on your Nintendo Switch.
Conclusion
And that’s how we become a Joy-Con repair expert! With a little bit of patience and some careful fixing, we can save the day and get back to playing our favorite games on the Nintendo Switch. High five for a job well done!


 PlayStation Repair
 Xbox Repair
 Nintendo Repair
 Virtual reality (VR) Repair
 Accessories Repair