From here you can book your game console, controller repair with us
Game Console & Controller Repairs
Any PS5 Console, PS5 Controller
Any PS4 Console, PS4 Controller
Any Xbox Series Console, Xbox Series Controller
Any Xbox One Console, Xbox One Controller
Any Nintendo Switch Console, Joy Con Controller
We’re going to learn about a little trouble that happens with Nintendo’s Joy Con controllers – it’s called drift. We’ll see what it is, why it matters, and get ready to fix it!
What is Joy Con Drift?
Have you ever been playing your Nintendo Switch and noticed that your character starts moving on its own without you even touching the controller? That’s what we call Joy Con drift. It’s like your Joy Con controllers have a mind of their own!
This annoying problem happens when the joystick on your Joy Con starts acting up and sending signals to the game even when you’re not moving it. Imagine trying to play Mario Kart, and your kart keeps veering off the track without you steering it – frustrating, right?
But don’t worry, we’re here to help you understand what causes Joy Con drift and how you can fix it so you can get back to enjoying your games without any unwanted movements!
Why Does Joy Con Drift Happen?
Have you ever wondered why your Nintendo Joy Con controllers sometimes act up and move on their own? That’s what we call Joy Con drift. Let’s dive into the reasons behind this frustrating issue.
Start your Buy, Sell, Repair Game Console. To find your closest store
Leave your mobile phone number and we will call you back
Nintendo Joy Con Repair
Sometimes, Joy Con drift happens because the controllers are getting old. Just like how toys or gadgets can wear out over time, the same thing can happen to these controllers. The internal parts might not work as well as they used to, causing the drift.
Another reason for Joy Con drift could be that the controllers got dirty inside. Dust and dirt can get into the tiny mechanisms of the Joy Cons, making them act strangely. So, it’s essential to keep your controllers clean to prevent this from happening.
Occasionally, the issue could stem from a physical damage inside the controllers. If a component is broken or not working correctly, it can lead to the Joy Con drift problem. This is why it’s crucial to handle your controllers with care to avoid any potential damage.
Can You Fix Joy Con Drift at Home?
In this section, we are going to find out if you can fix the Joy Con drift issue right at home. We will explore some simple steps that you can try on your own to get your Joy Cons working properly again.
Steps You Can Take
To fix the Joy Con drift issue at home, you can follow these steps:
Opening the Joy Cons
First, carefully open up the Joy Cons to see what’s going on inside. This step will help you identify the problem and understand how to fix it.
Replacing the Joystick
If you find that the joystick is causing the drift problem, you can learn how to take out the old joystick and replace it with a new one. This can help restore proper functionality to your Joy Con controllers.
Closing the Joy Cons
Once you have fixed the issue, put the Joy Cons back together carefully. Make sure everything is in its place and secure before testing them out to ensure they work as they should.
By following these steps, you may be able to resolve the Joy Con drift problem without needing to take your controllers to a repair shop. Remember to be patient and careful as you work on fixing your Joy Cons.
Tools You Need for Joy Con Repair
Before we start fixing our Joy Con controllers, we need to make sure we have the right tools. Here are some things you might need:
1. Tri-wing Screwdriver: This special screwdriver has three “wings” instead of a regular cross or flat head. It’s used to open up the Joy Cons without damaging the screws.
2. Phillips Head Screwdriver: You might also need a Phillips head screwdriver to handle some of the screws inside the Joy Cons.
3. Opening Pry Tool: This tool helps you carefully separate the parts of the Joy Con without scratching or breaking them.
4. Replacement Joystick: In case your joystick is damaged and needs to be replaced, make sure to have a new one ready to install.
With these tools on hand, we’ll be ready to open up the Joy Cons, fix any issues inside, and put everything back together properly. Now, let’s move on to the step-by-step process of fixing the Joy Con drift issue!
Step-by-Step Joy Con Drift Fix
In this section, we will walk through the steps to fix the Joy Con drift issue. By following these easy instructions, you can get your controllers working like new again. Let’s get started!
Opening the Joy Cons
First, we need to open up the Joy Cons carefully to see what’s causing the drift problem. Make sure to have a small screwdriver that fits the screws on the controller. Gently remove the screws and separate the controller casing to access the internal components.
Replacing the Joystick
If we find that the joystick is causing the drift, we will learn how to replace it. Carefully detach the old joystick from the controller’s circuit board and take note of how it is connected. Install the new joystick in the same position, ensuring a secure connection. Once the new joystick is in place, reassemble the Joy Con casing.
Closing the Joy Cons
With the new joystick installed and everything put back together, it’s time to close the Joy Cons. Align the casing pieces correctly and gently press them together until they snap into place. Make sure all the screws are back in their respective holes and tighten them securely. Your Joy Cons should now be fixed and ready for use!
Step
Description
1
Unplug the Joy-Con from the Nintendo Switch console.
2
Turn off the Joy-Con controller by pressing the small circular button on the side.
3
Use a screwdriver to remove the screws on the back of the Joy-Con.
4
Carefully open the Joy-Con and locate the joystick mechanism.
5
Clean the joystick mechanism with compressed air or electronic contact cleaner.
6
Check for any physical damage or debris causing the drifting issue.
7
Reassemble the Joy-Con and tighten the screws on the back.
8
Test the Joy-Con to see if the drifting issue has been resolved.
Test Your Fixed Joy Cons
After fixing the Joy Con drift issue, it’s essential to test your Joy Cons to ensure they are working properly. This test will help you make sure that everything is back to normal and you can enjoy playing your favorite games without any trouble.
How to Test Your Joy Cons
To test your fixed Joy Cons, follow these simple steps:
Connect the Joy Cons to your Nintendo Switch: Attach the Joy Cons back to your Nintendo Switch console.
Turn on the Nintendo Switch: Power on your console to check if the Joy Cons are properly connected and recognized.
Calibrate the Joy Cons: Go to the Settings on your Nintendo Switch and calibrate the Joy Cons to ensure they are responding correctly to your movements.
Test the Controls: Open a game and test the controls on the Joy Cons to see if they are functioning as they should. Move the joystick, press the buttons, and check if everything is working smoothly.
Check for Drift: Play a game that requires precise movement and see if the Joy Cons experience any drift. If you notice any drift, you may need to go back and readjust the joystick or check for any loose connections.
By following these steps, you can ensure that your Joy Cons are fixed and ready for hours of uninterrupted gaming fun on your Nintendo Switch!
Where to Get Help for Joy Con Repair
If you’ve tried fixing your Joy Cons at home but they still aren’t working properly, don’t worry! There are other places you can go to get the help you need. Let’s explore some options.
1. Local Repair Shops
If you’re not able to fix the Joy Cons on your own, you can look for a local repair shop that specializes in electronics or gaming devices. These experts have the knowledge and tools to diagnose and repair your Joy Con drift issue.
2. Nintendo Repair Centers
Nintendo has authorized repair centers in many locations. You can check online or contact Nintendo customer support to find the nearest repair center to you. They have trained technicians who can help fix your Joy Cons professionally.
3. Online Repair Services
If you prefer not to leave your home, you can also find online repair services that specialize in Nintendo products. They may offer mail-in services where you can send your Joy Cons for repair and have them shipped back to you once fixed.
4. Retail Stores
Some retail stores that sell electronics, including gaming consoles like the Nintendo Switch, may offer repair services or have partnerships with repair centers. Check with your local electronics store to see if they can assist with your Joy Con drift problem.
Remember, it’s essential to get help from professionals if you’re unsure about fixing the Joy Cons yourself. They have the expertise and experience to ensure your controllers work like new again!
Conclusion: Enjoying Your Nintendo Switch Again!
After following the steps in this guide, you should now be able to enjoy your Nintendo Switch without the frustrating Joy Con drift problem. By understanding what Joy Con drift is, why it happens, and how to fix it, you’ve taken control of keeping your controllers in great shape.
Remember, taking care of your Joy Cons by cleaning them regularly and being gentle with the joysticks can help prevent drift from happening again. If you ever notice the issue returning, you now have the knowledge and tools to address it promptly.
With your repaired Joy Cons, you can dive back into your favorite games on the Nintendo Switch without any interruptions or frustrations. Enjoy the seamless gameplay experience and immerse yourself in all the adventures your games have to offer!
FAQs
Is fixing Joy Con drift hard?
Fixing Joy Con drift may seem difficult at first, but with the right guidance and tools, most people can successfully resolve the issue. By following step-by-step instructions and being patient, you can tackle the problem and enjoy playing your Nintendo Switch without any disruptions.
How long does it take to fix Joy Con drift?
The time it takes to fix Joy Con drift can vary depending on the severity of the issue and your familiarity with repairing electronic devices. On average, it may take around 30 minutes to an hour to open up the Joy Cons, replace the joystick if necessary, and put everything back together. Taking your time and being careful during the process is essential to ensure a successful repair.
Do I need to buy anything to fix Joy Con drift?
In some cases, you may need to purchase a replacement joystick or specialized tools to fix Joy Con drift. These items can typically be found online or at electronics repair shops. Additionally, having a small screwdriver set and a clean workspace can help make the repair process easier. It’s important to gather all necessary tools and parts before starting the repair to avoid any delays.

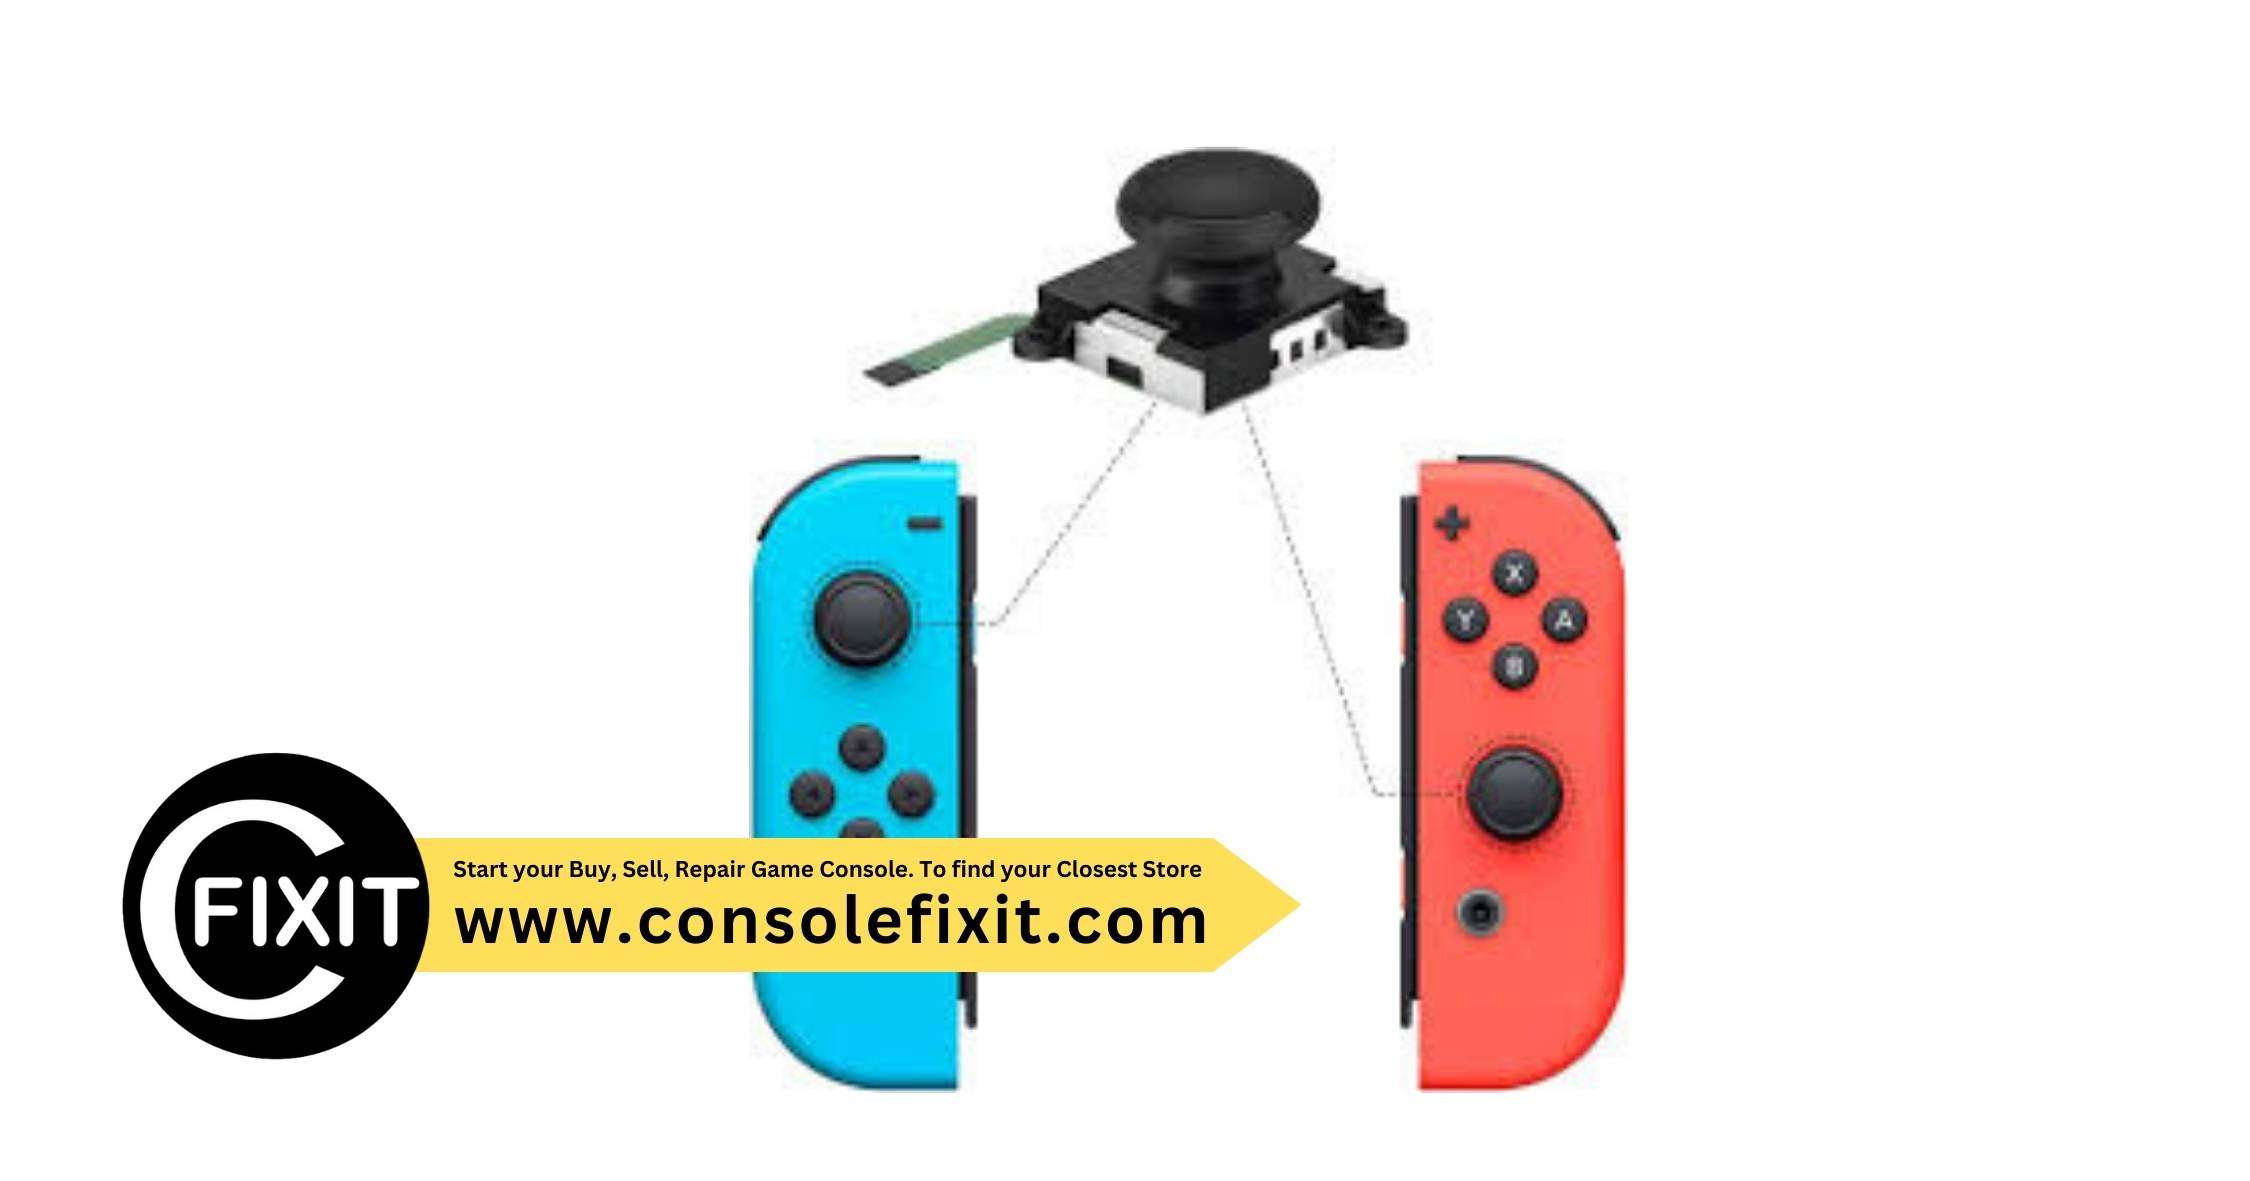
 Image courtesy of Obsahovka Obsahovka via


 PlayStation Repair
 Xbox Repair
 Nintendo Repair
 Virtual reality (VR) Repair
 Accessories Repair