
 PlayStation Repair
 Xbox Repair
 Nintendo Repair
 Virtual reality (VR) Repair
 Accessories Repair
Fix Your Joy-Con Drift: A Step-by-Step Guide

Unleash the secrets to fixing Joy-Con drift once and for all with our comprehensive step-by-step guide. Don’t miss out!
 Image courtesy of Obsahovka Obsahovka via
 Table of Contents
- Introduction: The Troublesome Joy-Con Drift
- Recognizing the Drift
- Gathering the Right Tools
- Preparation: Getting Your Space Ready
- Step-by-Step Joy-Con Repair Guide
- Testing Your Fixed Joy-Con
- Caring for Your Joy-Cons to Prevent Future Drifts
- Conclusion: Back to Gaming with Confidence
- FAQs (Frequently Asked Questions)
Introduction: The Troublesome Joy-Con Drift
Let’s talk about why your Nintendo Switch controllers, called Joy-Cons, might not be working right and what this ‘drift’ thing is. If you’ve been experiencing issues with your Joy-Con while playing your favorite games, don’t worry, we’re here to help you understand and fix it!
What is Joy-Con Drift?
Picture this: you’re playing Mario Kart, and suddenly your character starts moving on its own without you even touching the controller. That’s what we call Joy-Con drift. It’s like your controller has a mind of its own and decides to go on an adventure without you!
Recognizing the Drift
Do you ever feel like your Nintendo Switch controllers, the Joy-Cons, are not quite working the way they should be? Maybe they are moving on their own when you’re not touching them or making your game characters do things you didn’t ask them to. Well, that could be a sign of something called ‘Joy-Con drift’.
What is Joy-Con Drift?
Joy-Con drift is when the joystick on your controller starts to act up. Instead of staying still when you’re not touching it, it might move around on its own. This can be a real pain when you’re trying to play your favorite games because it can make your game character move in directions you don’t want them to go. Imagine trying to win a race in Mario Kart, but your kart keeps going off the track all by itself – that’s what Joy-Con drift feels like!
Gathering the Right Tools
Before you start fixing the annoying Joy-Con drift, you need to make sure you have all the right tools at your disposal. Here’s a list of what you’ll need:

Image courtesy of www.ign.com via Google Images
Joy-Con Repair Kit
You’ll need a specific repair kit designed for fixing Joy-Con drift. This kit usually includes a replacement joystick, screwdrivers, tweezers, and other tools necessary for disassembling the controller.
Clean Cloth
Having a clean cloth on hand is essential for wiping down the parts of the Joy-Con as you work on it. Keeping everything clean will prevent any dirt or dust from interfering with the repair process.
Tweezers
Tweezers come in handy for handling small components and screws during the repair. They make it easier to pick up and place tiny parts without dropping them.
Small Screwdriver Set
A set of small screwdrivers will be needed to remove the screws holding the Joy-Con together. Make sure you have the right size screwdriver for the job to avoid damaging the screws.
Replacement Joystick
The most crucial tool you’ll need is the replacement joystick. This is the part that will fix the drift issue and make your Joy-Con work like new again. Make sure to get a high-quality replacement to ensure long-lasting results.
Preparation: Getting Your Space Ready
Before you start fixing your Joy-Con, it’s essential to get your space set up properly. By preparing your workspace, you can ensure that you have everything you need and avoid losing any tiny parts during the repair process. Here’s how to get your space ready:
Start your Buy, Sell, Repair Game Console. To find your closest store
Clean and Organized Workspace
Find a clean, flat surface to work on, like a table or desk. Make sure the area is well-lit so you can see the tiny components of the Joy-Con clearly. Clear any clutter to prevent losing small screws or pieces while you work. It’s a good idea to have a clean cloth or towel handy to place your Joy-Con and tools on to keep everything organized.
Gather Your Tools
Collect all the necessary tools for the repair. You’ll need a small Phillips-head screwdriver to open the Joy-Con casing, a pair of tweezers to handle small parts, and a plastic opening tool to carefully separate the components. It’s also helpful to have a small container to keep all the screws in so they don’t roll away. Having all your tools within reach will make the repair process much smoother.
Step-by-Step Joy-Con Repair Guide
Is your Nintendo Joy-Con controller giving you trouble with that annoying joystick drift? Don’t worry, we’ve got you covered with an easy-to-follow repair guide to get your gaming back on track!
Opening Up the Joy-Con
First things first, carefully open up the Joy-Con casing to get access to the joystick inside. Make sure to handle the small screws with care and keep track of them to avoid losing any parts.
Removing the Old Joystick
Next, gently remove the old joystick that’s causing the drift. Take your time and follow the instructions closely to avoid damaging any components inside the controller.
Installing the New Joystick
Now, it’s time to install the new joystick replacement. Place it in the correct position and secure it in place according to the provided instructions. Make sure everything fits snugly before moving on.
Reassembling the Joy-Con
Once the new joystick is in place, carefully put everything back together. Double-check that all parts are properly aligned and tightened. Take your time with this step to ensure everything is back in place correctly.
| Step | Description |
|---|---|
| 1 | Identify the affected Joy-Con controller(s) |
| 2 | Power off the Nintendo Switch |
| 3 | Detach the Joy-Con from the console |
| 4 | Inspect the joystick for debris or dust |
| 5 | Clean the joystick using compressed air or alcohol |
| 6 | Check for any physical damage |
| 7 | Reattach the Joy-Con to the console |
| 8 | Test the controller to see if the drifting issue is resolved |
| 9 | If the issue persists, consider contacting Nintendo for repair |
Now that you’ve completed the repair process, it’s time to test your fixed Joy-Con to make sure the drift issue is gone!
Testing Your Fixed Joy-Con
Now that you’ve gone through the process of fixing the Joy-Con drift by replacing the faulty joystick, it’s time to test whether your efforts have paid off. Follow these simple steps to ensure that your Joy-Con is working as good as new.
1. Powering Up Your Nintendo Switch
First, turn on your Nintendo Switch console and make sure it’s fully charged. You’ll need to pair the Joy-Con you just repaired with the console to test it.
2. Pairing Your Joy-Con
Hold down the small button located next to the charging port on the Nintendo Switch while the console is on. The Joy-Con will vibrate and a light will flash to show that it’s connected.
3. Testing the Joystick
Launch a game that requires movement with the joystick, such as Mario Kart or Zelda. Move the joystick in all directions to check if the drift issue has been resolved. The character on the screen should respond accurately to your commands without any unwanted movements.
4. Checking for Drift
If you notice any drift or unwanted movements while playing, try recalibrating the Joy-Con. Go to the System Settings on your Nintendo Switch, select Controllers and Sensors, and then choose Calibrate Control Sticks. Follow the on-screen instructions to recalibrate the joystick.
If after recalibration the drift issue persists, you may need to revisit the repair process to ensure that the new joystick is installed correctly.
Caring for Your Joy-Cons to Prevent Future Drifts
Now that you’ve successfully fixed your Joy-Con drift issue, it’s essential to learn how to care for your controllers properly to prevent future problems. Follow these tips to keep your Joy-Cons in top-notch condition for long-lasting gaming enjoyment.
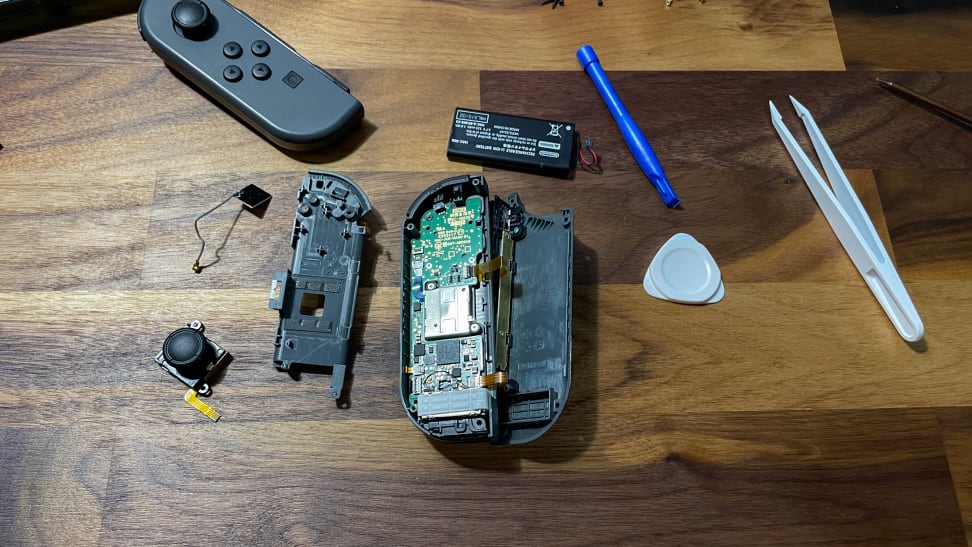 Image courtesy of reviewed.usatoday.com via Google Images
1. Keep Your Joy-Cons Clean
Regularly clean your Joy-Cons to prevent dirt and debris from causing issues with the joystick or buttons. Use a soft, dry cloth to wipe down the controllers gently. Avoid using water or harsh chemicals that could damage the electronics.
2. Store Your Joy-Cons Safely
When you’re not using your Joy-Cons, store them in a protective case or in a designated spot where they won’t get knocked around or damaged. Avoid leaving them in extreme temperatures or humid environments, as this can affect their performance.
3. Avoid Dropping or Mishandling Your Joy-Cons
Be careful when using your Joy-Cons to avoid dropping them or subjecting them to rough handling. Even though they’re designed to be durable, excessive force or impact can cause components to shift or break, leading to drift issues.
4. Update Your Joy-Cons Regularly
Make sure to keep your Joy-Cons and Nintendo Switch system updated with the latest firmware. Updates can fix bugs and improve performance, reducing the risk of drift occurring due to software issues.
5. Play Responsibly
While it’s tempting to get caught up in intense gaming sessions, try to take breaks to give your Joy-Cons a rest. Continuous, prolonged use can put strain on the controllers and contribute to drift problems over time.
Conclusion: Back to Gaming with Confidence
Now that you have successfully fixed the Joy-Con drift on your Nintendo Switch controllers, it’s time to get back to gaming with confidence. No more frustrating joystick issues getting in the way of your gameplay!
By following the step-by-step guide provided and taking care of your Joy-Cons, you’ve shown that you have the skills and determination to tackle technical challenges head-on. Remember, with a little patience and the right tools, you can solve many common gaming issues on your own.
Repairing your Joy-Cons not only saves you money but also gives you a sense of accomplishment and empowerment. You’ve taken control of the situation and found a solution that works for you. This experience can boost your confidence and show you that you’re capable of handling technical problems on your own.
So, next time you encounter a Joy-Con drift or any other gaming issue, don’t be afraid to roll up your sleeves, gather your tools, and dive in. With the knowledge and skills you’ve gained from this repair, you’ll be better equipped to handle whatever challenges come your way in the world of gaming.
FAQs (Frequently Asked Questions)
Can I fix Joy-Con drift by myself?
Yes, you can fix Joy-Con drift by yourself, especially with the step-by-step guide we’ve provided. With the right tools and following the instructions carefully, even an 11-year-old can successfully repair the Joy-Con drift issue.
Do I need to buy a new Joy-Con?
You don’t necessarily need to buy a new Joy-Con right away. In many cases, repairing the Joy-Con drift by replacing the joystick can solve the problem and save you money. However, if the drift continues even after repair, then it may be time to consider getting a new Joy-Con.
What should I do if I can’t fix the drift?
If you find that fixing the drift is too challenging or if the problem persists even after attempting the repair, don’t worry. It’s okay to ask for help. You can seek professional assistance from a repair store or a trusted adult who can guide you through the process. Sometimes, a more experienced hand can make all the difference in getting your Joy-Con back in working order.
Game Console and Controller Repair

Your Repair , Our Concern- Leave your mobile phone number and we will call you back . Consolefixit are experts at fixing game consoles. If your Xbox, PlayStation, or Nintendo is broken and needs repairing, give us a call for a free quote today.


