From here you can book your game console, controller repair with us
Game Console & Controller Repairs
Any PS5 Console, PS5 Controller
Any PS4 Console, PS4 Controller
Any Xbox Series Console, Xbox Series Controller
Any Xbox One Console, Xbox One Controller
Any Nintendo Switch Console, Joy Con Controller
Welcome to our guide on keeping your PS4 controller in top shape! If you own a Sony PlayStation 4 Slim, then you know how essential the controller is for navigating your favorite games. In this section, we’ll dive into the basics of the PS4 controller and why it’s crucial to take good care of it. Let’s explore why these controllers are so important and what you can do to ensure they last a long time.
When you purchase a PS4, it usually comes with a controller that allows you to interact with the console and enjoy your gaming experience. These controllers are specially designed to work seamlessly with your PlayStation, providing you with the control you need to play games effectively. However, like any electronic device, these controllers can sometimes encounter issues that require a bit of attention and care to fix.
Throughout this guide, we will cover various aspects of PS4 controller care, including maintenance tips, troubleshooting common problems, and even how to repair certain issues on your own. By understanding the importance of proper care and maintenance, you can ensure that your PS4 controller remains in optimal condition for all your gaming adventures.
Common Issues with PS4 Controllers
When it comes to using your PS4 controller, you may encounter a few common issues that can get in the way of your gaming experience. Let’s take a look at some of the typical problems you might face with your controller and how you can resolve them.
Sticky Buttons
One of the most common issues with PS4 controllers is sticky buttons. This can happen when dirt, dust, or debris gets trapped around the buttons, making them harder to press smoothly. To fix this problem, you can gently clean around the buttons using a cotton swab dipped in rubbing alcohol. This should help remove any residue that is causing the stickiness.
Connection Problems
Another common issue you might encounter is connection problems between your controller and your PS4. This can result in your controller not responding or having delays when you press the buttons. To troubleshoot this issue, try resetting the controller by pressing the reset button on the back with a small pin. You can also try connecting the controller using a different USB cable to see if that resolves the problem.
Battery Issues
If you notice that your controller’s battery is not holding a charge as long as it used to, you may be facing battery issues. Over time, the battery in your controller can wear out and lose its ability to hold a charge. In this case, you may need to replace the battery to restore your controller’s battery life. You can find replacement batteries online and follow a guide to replace it yourself.
Safety First: Getting Ready to Fix Your Controller
Before we start fixing anything, it’s super important to make sure we do it safely. This means we’ll get our workspace ready and gather the right tools without rushing.
First things first, let’s make sure we have all the tools we need to tackle fixing your PS4 controller. You’ll need some tiny screwdrivers to help open up the controller and get to the insides. It’s important to use the right tools for the job to avoid causing any damage while trying to fix things.
Start your Buy, Sell, Repair Game Console. To find your closest store
Leave your mobile phone number and we will call you back
Creating a Safe Workspace
Now that we have the tools ready, let’s create a safe workspace to work on your controller. This means finding a clean, well-lit area where you can spread out and not worry about losing any small pieces. It’s a good idea to work on a flat surface so things don’t roll away, and make sure there are no distractions that could lead to accidents.
Step-by-Step Guide to Fixing Your Controller
Are you ready to roll up your sleeves and bring your PS4 controller back to life? Let’s dive into the step-by-step process of fixing your controller from start to finish.
Opening Your PS4 Controller
To begin the repair process, you’ll first need to carefully open up your PS4 controller. Use a small screwdriver to remove the screws holding the controller together. Gently pry open the casing, being cautious not to damage any internal components. Once opened, you’ll have access to the inside of the controller where you can start troubleshooting and making repairs.
Replacing the PS4 Controller Cable
If you’re experiencing issues with your controller not charging or connecting properly, it might be time to replace the controller cable. Disconnect the old cable by carefully removing it from the controller and connect the new cable in its place. Ensure the connection is secure before closing up the controller.
Fixing Connection Issues
If your controller is having trouble connecting to your PS4, there may be a few simple fixes you can try. Check the wireless connection settings on your PS4 and make sure your controller is charged. You can also try resetting the controller by pressing the reset button. If these steps don’t work, you may need to further troubleshoot or seek professional help.
Testing Your Repaired Controller
Now that we have fixed your PS4 controller, it’s time to make sure everything is back to normal before you start gaming again!
First, let’s check if all the buttons on your controller are working properly. Press each button one by one and see if they respond as they should. You should feel a click when you press them, and your PS4 should register the input on the screen.
Testing Battery Life
Next, let’s make sure your controller’s battery is holding a charge. Plug your controller into your PS4 using the USB cable and let it charge for a while. Once it’s fully charged, unplug it and see how long it lasts. Play some games and keep an eye on the battery indicator to make sure it’s working as it should.
When to Seek Help From a Professional
Sometimes, even after trying our best, we might come across problems with our PS4 controllers that are too tricky to fix on our own. In such cases, it’s essential to know when to seek help from a professional who specializes in repairing PS4 controllers.
Finding Repair Shops
If you find yourself stuck with a controller issue that you can’t solve, you can start by looking for nearby repair shops that offer services for fixing PS4 controllers. These shops have skilled technicians who understand the ins and outs of gaming controllers and can help diagnose and repair the problem.
Understanding Repair Costs
While fixing your controller yourself can save you money, there are times when seeking professional help may be worth the cost. Repair shops usually charge a fee for their services, which can vary depending on the complexity of the issue and the parts needed for the repair. However, it’s essential to weigh the cost of repair against the time and effort it would take you to fix the controller yourself.
By seeking help from a professional, you can ensure that your PS4 controller is in good hands and will be repaired correctly. Plus, it can save you the frustration of trying to troubleshoot a complicated problem on your own.
Conclusion: Becoming a PS4 Controller Repair Master
Throughout this DIY guide, you have gained valuable knowledge on how to take care of your precious PS4 controller. By understanding the common issues that may arise, learning how to fix them step-by-step, and testing your repairs, you are well on your way to becoming a PS4 Controller Repair Master.
Fixing your controller not only saves you time and money but also gives you a sense of pride and accomplishment. You have the power to keep your gaming experience uninterrupted and enjoyable by mastering the art of controller repair.
Remember, practice makes perfect, so don’t be afraid to dive into more complex repairs as you hone your skills. And if you ever feel stuck or unsure, there are always professionals near you who can help guide you through the process.
With the know-how you’ve gained from this guide, you are well-equipped to tackle any future issues that may arise with your PS4 controller. So go ahead, grab your tools, and show that controller who’s boss!

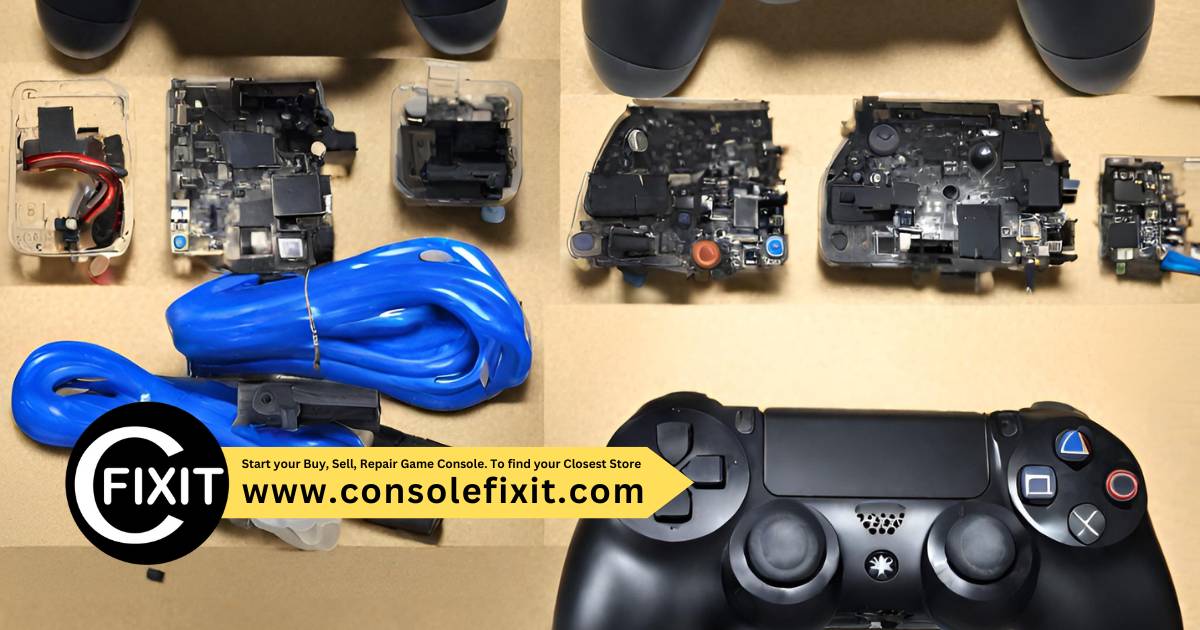
 Image courtesy of Sergey Meshkov via
 Image courtesy of www.ifixit.com via


 PlayStation Repair
 Xbox Repair
 Nintendo Repair
 Virtual reality (VR) Repair
 Accessories Repair