From here you can book your game console, controller repair with us
Game Console & Controller Repairs
Any PS5 Console, PS5 Controller
Any PS4 Console, PS4 Controller
Any Xbox Series Console, Xbox Series Controller
Any Xbox One Console, Xbox One Controller
Any Nintendo Switch Console, Joy Con Controller
introduction Continue with step 1 Follow this guide to replace worn or broken analog stick covers for the CUH-ZCT1E DualShock 4 controller model.
Please note that analog stick cases are not responsible for stick slippage. If the analog sticks are not working properly, you may need to clean or replace the analog stick module.
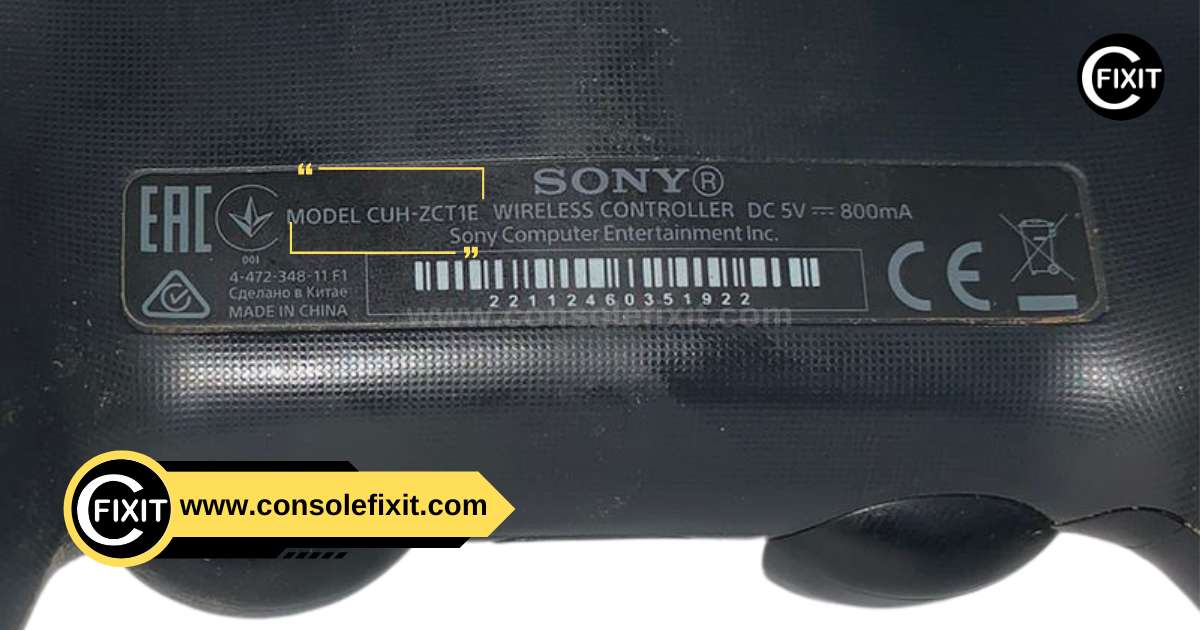
Step 1 Check your controller model DualShock 4 (CUH-ZCT1E) replace the analog stick cover, check your controller model: Step 1, Figure 1. 1/1 Check the model number on the back of the controller. This manual is for CUH-ZCT1E. If you have a different model, the instructions and spare parts may be slightly different.
If you have a second generation DualShock 4, model CUH-ZCT1E, please use it
Step 2 Unlock the back cover DualShock 4 (CUH-ZCT1E) analog stick cover replacement, back lock lock: step 2, image 1 of 2
If you need to stabilize the controller during this repair, place it on a soft surface such as a microfiber cloth.
Using a Phillips screwdriver, remove the four 6.4mm screws that secure the back cover.
To find your closest store
Leave your mobile phone number and we will call you back
Use an opening pick to separate each corner of the L1 button from the bezel.
Cover the knob so it doesn’t leave the work area.
Open button.
Use an open selection to open the R1 button like you did for the L1 button.
Attach the rear frame to the front frame with six plastic clips. The next four steps show how to release these clips before opening the controller.
Place an open bezel at a downward angle between the front and back bezels, between the handle and the action button.
Slide the pick towards the handle and remove the first clip.
Repeat this step on the other side of the controller to release the second clip.
Two more clips secure it near the expansion port and headphone jack on the rear bezel.
Place a pop-up frame between the front and back frames on either side of the door.
Rotate the puck so that part of the back frame separates from the front frame.
If you feel the rear frame is stuck, use a pry bar and rotate it from different angles.
Locate the clip in the slot above the R2 or L2 button.
Insert the tip of a spudger into the slot above the R2 button and push outward on the retaining clip.
While pushing the clips outward, gently separate the back bezel from the front bezel.
Do not fully open the controller until the R2 and L2 clips are released.
Repeat this step for the clip near the L2 button.
Press the R2 button and pull up the rear frame.
Press the L2 button and drag the back frame onto it.
Place the back cover upside down on the controller, being careful not to strain the attached cables.
Use tweezers or your fingers to pull the blue pull-tab straight out of the socket and remove the connector cable.
When reassembling, connect the cables so that the blue pull-tab faces the outside of the controller.
Using tweezers or your fingers, grasp the end of the battery cable and disconnect it from the logic board.
Remove the battery.
Take the reset button extension and remove it from the battery holder slot.
Locate the two clips that secure the battery holder to the logic board.
Insert the tip of a spudger into the hole behind the right retention clip.
Press the clip to release it from the motherboard.
Lift the right end of the battery holder.
Insert the tip of a spudger into the hole behind the left retention clip.
Press the clip to release it from the motherboard.
Remove the battery holder.
Use the point of a spudger to flip the locking tab that secures the touchpad cable ZIF connector.
Using tweezers or your fingers, disconnect the cable using the blue pull-tab.
Using a Phillips screwdriver, remove the 6.4mm screws securing the motherboard.
Remove the motherboard from the middle section.
Slide the analog stick cover through the cutout in the front bezel.
Slide the main circuit board to the bottom of the controller and connect the vibration motor cable.
Grasp the analog stick cover and pull it straight out of the module.


 PlayStation Repair
 Xbox Repair
 Nintendo Repair
 Virtual reality (VR) Repair
 Accessories Repair